Connect your own number
Your Call Agents can answer and place calls on a number that stays on your own carrier or phone system, such as Twilio, Telnyx, Plivo, Vonage, Bandwidth, or a PBX. You connect your carrier to Resia with a SIP connection, then add your numbers to it. In this guide, you will create a SIP connection, add a number, send its calls to Resia, and place a test call through your carrier.
How it works
- Inbound: your carrier sends a call for your number to Resia's SIP address. The Call Agent that you assign to the number answers it.
- Outbound: Resia sends the agent's call to your carrier's trunk, with a SIP user name and password. Your carrier checks the password, shows your number as the caller, and connects the call.
- A connection without outbound details makes its numbers inbound-only.
- Your own phones and phone system keep working. Resia is one more sender on your carrier account.
A number on your own carrier has no monthly rent at Resia. Resia does not send or receive texts on it, and it cannot go on a 10DLC campaign. Calls on it are priced per connected minute, like other calls. See Billing.
Before you start
- Complete Get access. Keep that terminal open, with
RESIA_API_BASEandRESIA_API_KEYset. - An approved, active Call Agent. The Quickstart creates one.
- A number on your own carrier, in the US or Canada. Resia uses each number in E.164 form, with the plus sign, such as +14155550100.
- For outbound calls: a SIP trunk at your carrier that accepts a user name and password. Create a separate SIP credential for Resia, so that you can change or remove it without touching your other phones.
- Write every phone number in E.164 form, such as
+12125550142. See Number format.
Resia signs in to your trunk with a user name and password. Resia has no fixed IP addresses, so an IP allow-list does not work. Do not admit Resia's calls by IP address at your carrier.
Create a SIP connection
Send your carrier's termination URI, the SIP user name and password, and the transport.
The termination URI is the address of your trunk, for example acme.pstn.twilio.com. A port and a sip: prefix are accepted.
The transport is tls when you omit it. Choose tcp or udp only if your carrier or PBX has no TLS.
read -r -s -p "SIP password: " SIP_PASSWORD && echo

jq -n --arg password "$SIP_PASSWORD" '{
  name: "Twilio main",
  outbound: {termination_uri: "acme.pstn.twilio.com", username: "resia-agent", password: $password, transport: "tls"}
}' | curl --fail-with-body --silent --show-error \
  "$RESIA_API_BASE/v1/sip-connections" \
  --header "Authorization: Bearer $RESIA_API_KEY" \
  --header "Content-Type: application/json" \
  --data @- \
  --output sip-connection.json

jq '{sip_connection_id, name, outbound}' sip-connection.json
Expected result: HTTP 201 with the connection. outbound shows the host, the user name, and the transport. No response ever shows the password.
For inbound-only numbers, send only name.
In the portal: open Numbers, select Add number, then Connect via SIP trunk. See In the portal.
API reference: Create a SIP connection.
Add your number
Send the number in E.164 form.
SIP_CONNECTION_ID="$(jq -r .sip_connection_id sip-connection.json)"
CALL_AGENT_ID="your Call Agent id"

jq -n --arg connection "$SIP_CONNECTION_ID" --arg agent "$CALL_AGENT_ID" \
  '{phone_number: "+14794155508", sip_connection_id: $connection, inbound_call_agent_id: $agent}' |
  curl --fail-with-body --silent --show-error \
    "$RESIA_API_BASE/v1/phone-numbers" \
    --header "Authorization: Bearer $RESIA_API_KEY" \
    --header "Content-Type: application/json" \
    --data @- \
    --output own-number.json

jq '{phone_number, inbound_call_agent_id, sip_connection_id}' own-number.json
Expected result: HTTP 201. The number is on your numbers list, with its sip_connection_id.
HTTP 409 means that the number is already active in Resia. Contact support if you hold the number and did not add it.
API reference: Add your own number.
Send inbound calls to Resia
At your carrier, send calls for the number to Resia's SIP address, resia-inbound.sip.telnyx.com. The portal shows the same addresses on the SIP connections tab in Settings, ready to copy.
- A carrier, such as a Twilio Elastic SIP Trunk: enter one address for each trunk, as its origination URI:
sip:resia-inbound.sip.telnyx.com;transport=tls. The carrier puts the dialed number in each call, so all the numbers on the trunk use this one address. - A phone system (PBX) that sends each number to an exact address: send the calls for each number to
sip:+1<number>@resia-inbound.sip.telnyx.comon port5061over TLS. The part before@is the number in E.164 form. Use this form only for a PBX; a carrier needs only the one address above.
Use TLS when your carrier or PBX supports it. Your carrier still decides which calls go to Resia; calls that it does not send keep ringing your phones.
Call your number from another phone. Expected result: your Call Agent answers. The call appears in GET /v1/calls with direction inbound.
Place a test call through your carrier
You can use your own number as the caller of an outbound call through Resia. The call goes through your carrier's trunk, so the person you call sees your number.
jq -n --arg agent "$CALL_AGENT_ID" \
  '{call_agent_id: $agent, to_phone_number: "+12125550142", from_phone_number: "+14794155508", inputs: {}}' |
  curl --fail-with-body --silent --show-error \
    "$RESIA_API_BASE/v1/calls" \
    --header "Authorization: Bearer $RESIA_API_KEY" \
    --header "Content-Type: application/json" \
    --header "Idempotency-Key: $(uuidgen)" \
    --data @- \
    --output trunk-call.json

jq '{id, status}' trunk-call.json
Expected result: HTTP 202 with a call id. Then the phone rings and shows your number. Your carrier's own rules decide which caller numbers it accepts; Twilio, for example, accepts only a number on your account or a verified caller ID.
In the portal: after you save, the portal opens the page of the number. Select Place a test call there.
Change or remove a connection
PATCH /v1/sip-connections/{sip_connection_id}changes the connection in place; all of its numbers use the change. Omitpasswordto keep the stored password. Omittransportto keep the current one. Sendoutbound: nullto make its numbers inbound-only.PATCH /v1/phone-numbers/{phone_number}withsip_connection_idmoves a number to another of your connections. The next call from the number uses the new connection's trunk, and so does a queued call that has not started. A number bought from Resia cannot move, andnullis refused: remove the number instead.DELETE /v1/phone-numbers/{phone_number}removes a number from Resia at once. Your carrier keeps the number.DELETE /v1/sip-connections/{sip_connection_id}removes a connection that no number uses.
In the portal
To connect a number, open Numbers, select Add number, then select Connect via SIP trunk. The Connect a number via SIP trunk dialog opens. In it, enter your numbers, select a SIP connection or create a new one, and select the Call Agent that answers inbound calls. The outbound details are optional: the termination URI, the transport, and the SIP user name and password. The dialog shows the setup text for your carrier.
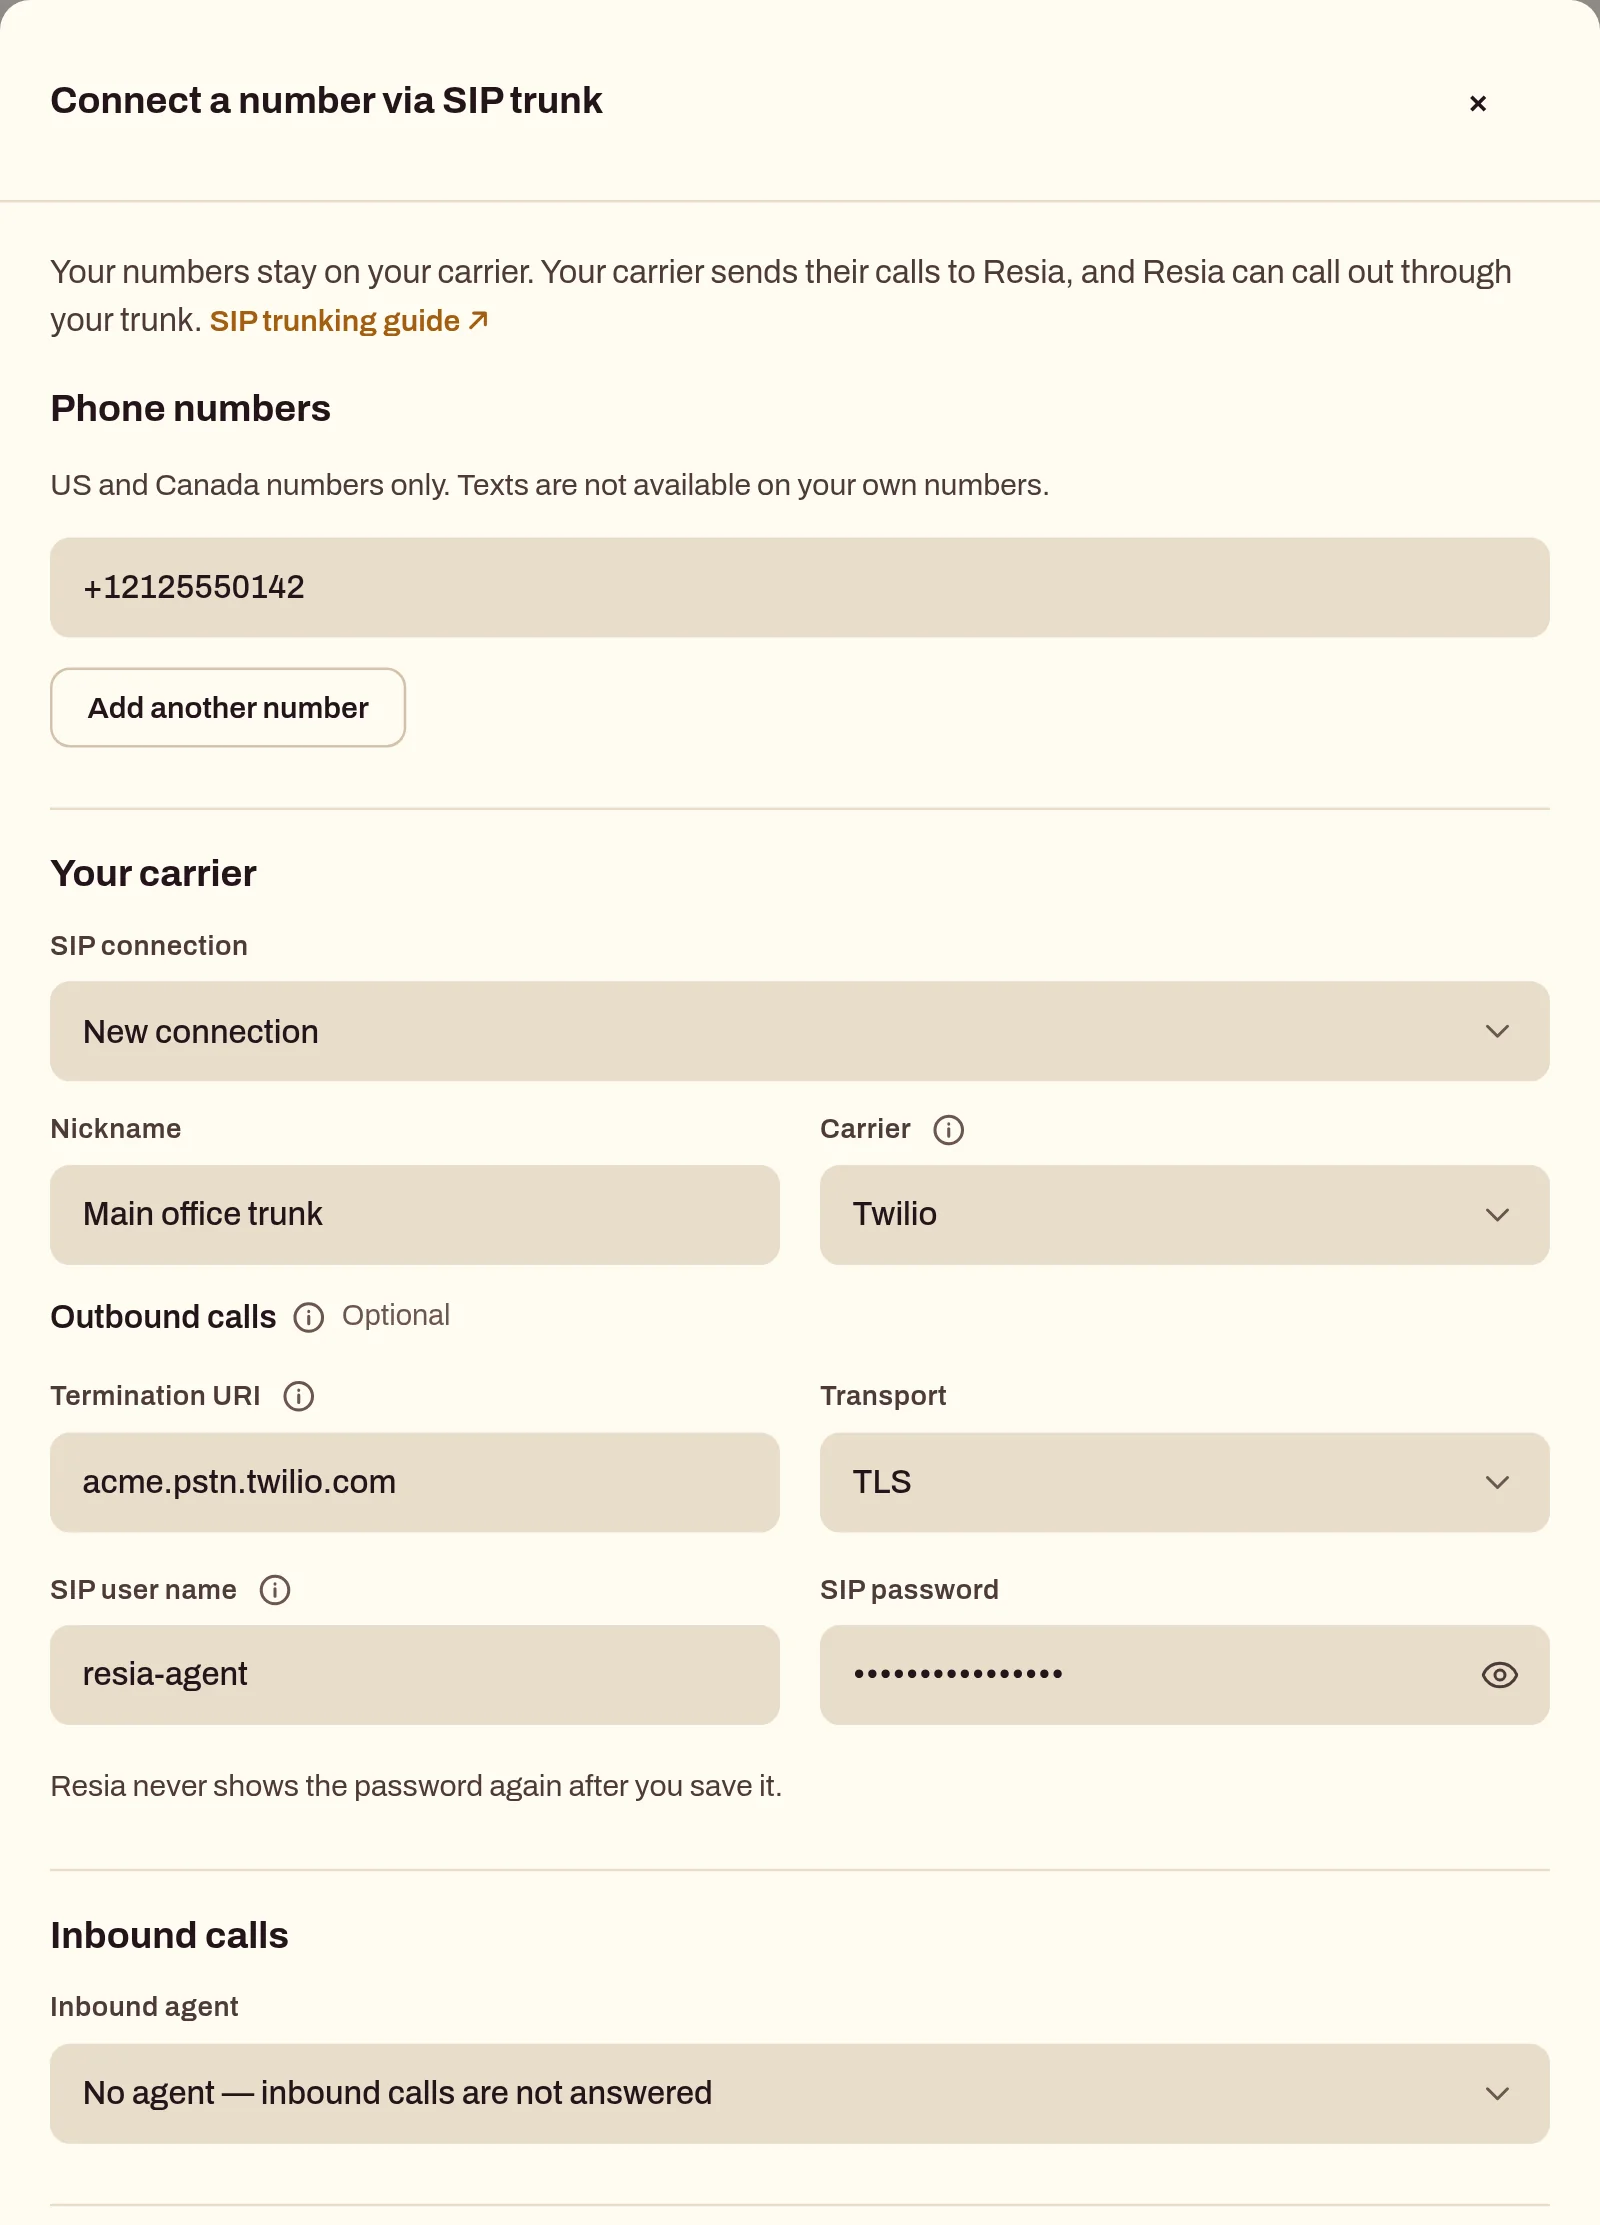
After you save, the portal opens the page of the number. The page shows the inbound address to enter at your carrier. When the connection has outbound details, the page also shows Place a test call. In the Numbers list, each of your own numbers has the SIP trunk tag.
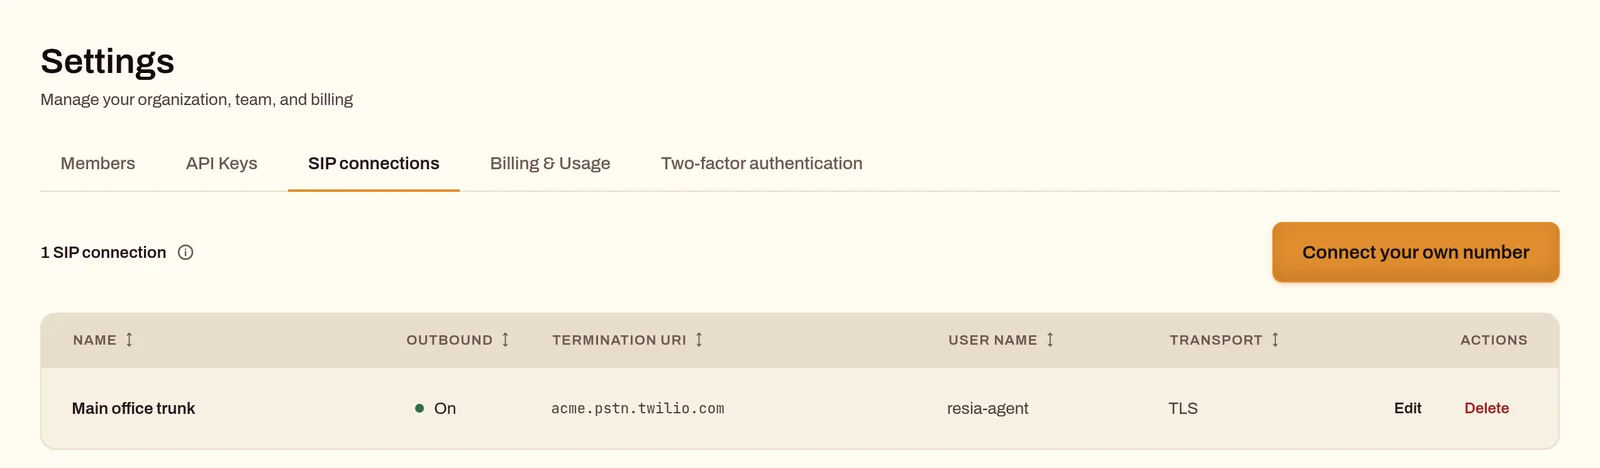
To see your connections, open Settings and select the SIP connections tab, after API Keys. The tab shows each connection with its outbound state, termination URI, user name, and transport. Select Edit to change a connection. Select Delete to remove a connection that no number uses. The tab also shows the SIP address for your carrier or PBX. Select Connect via SIP trunk to add a number from this tab.
If something fails
Refused before the call starts
Resia refuses these requests. It dials nothing.
| Status | When | What to do |
|---|---|---|
422 |
You place a call from a number whose connection has no outbound details. | Add outbound details to the connection with PATCH. |
422 |
You send a text from the number, assign a Chat Agent to it, or put it on a 10DLC campaign. | Use a number bought from Resia for texts. |
422 |
You move a number bought from Resia to a SIP connection, or you send sip_connection_id: null. |
A bought number stays on Resia. To take your own number off its connection, remove the number. |
409 |
You add a number that is already active in Resia. | Contact support if you hold the number and did not add it. |
409 |
You create a connection with the name of another of your connections. | Use a different name. |
409 |
You remove a connection that a number still uses. | Remove its numbers or move them to another connection first. |
Failed at your carrier
Resia accepted the call, but your carrier refused it. The call fails, and failure.sip_hangup_cause shows the carrier's code:
| Code | Meaning | What to check |
|---|---|---|
401, 407 |
The carrier refused the user name or password. | The SIP credential at your carrier and the connection's username; send the password again with PATCH. |
403 |
The carrier refused the call. | Check that the caller number is on your trunk. Check the user name and password: Twilio answers a wrong user name or password with 403 (error 32202). |
408 |
The carrier did not answer. | The termination URI and the transport. |
503 |
The carrier could not take the call. | The trunk's capacity and status at your carrier. |
Other problems
- An inbound call does not reach your agent: check that the number has an inbound agent, that your carrier sends the call to the SIP address in the portal, and that the number in the address is in E.164 form.
- An inbound call on an inbound-only number rings out when its Call Agent has participants, because Resia cannot dial a participant without outbound details. Add outbound details to the connection, or remove the participants from the agent.
- A caller that is a PBX extension, such as
101@pbx.example, shows that value as the caller. An agent with an input webhook answers it only when the agent works with no inputs, because the webhook'sfrom_phone_numbermust be a phone number.
Next steps
- Receive an inbound call: assign agents and test inbound calls.
- Bring another person onto a call: on a call on your own number, Resia dials each participant through the same carrier trunk as the call. An inbound-only number cannot add participants: when its agent has participants, its inbound calls ring out.